In this tutorial we will teach the basics of Data Preparation (Data Prep) using Microsoft Power BI. Creating visualizations with Power BI is the easy part. The science and sometimes art of Data Prep is a much more difficult skill to master. As you begin creating reports and Dashboards using Power BI you discover that the vanilla, “out-of-the-box” visualizations are perfect for what you need about 65% – 70% of the time. The other 30% – 35% of the time it will take more work to complete the visualization that your shooting for. Much of the time you will have to manufacture new columns and/or new totals. The process of creating these new columns and totals is call Data Prep.
The first part of the Data Prep process is connecting to your data. Most of the time your data is in more that one table table and sometimes it is even in different data sources. Some data may be in excel, some may be in a database and maybe some of your data is even on a website. This is the first lesson in the NFL Analysis course and in this lesson we are going to concentrate on the Joining, Merging and Appending data. In the our first topic we are going to connect to two spreadsheets. The purpose of this exercise will be to determine whether we can, more often than not, predict the winner of games based on the amount of money the teams are paying their offensive line. In this tutorial you will learn the following Power BI skills:
- Learn to connect to a single spreadsheet within Power BI.
- Learn to edit queries in the Power BI Query Editor.
- Learn to remove columns from tables in the Power BI Query Editor.
- Learn to remove errors within the Power BI Query Editor.
- Learn to change column data types in Power BI.
- Within Power Bi learn to remove duplicate rows in your tables.
- Learn to connect to a second spread sheet.
- Learn the difference between a Left Outer Join and an Inner Join using the Power BI Relationship view.
- Learn the difference between a one to many relationship and a one to one relationship.
- Learn to debug issues within the Power BI relationships view.
- Finally, learn how to change a relationship from a single direction to work in both directions.
How to Get Data in Power BI
For the purposes of this lesson we will use two excel files. File one is the 2017 roster of all NFL teams. The second file are the 2017 starters of each NFL team. It is important to note that this data, although accumulated from public sources is NFL data. Here at the two files that we will use for this lesson:
All Starters All Rosters
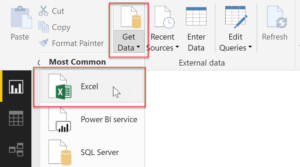
Download the files to a folder and then open Power BI. Use the image to the left as a reference. Your going to select the Get Data option on the menu bar. The most common Data Connections will then drop down. Your going to select Excel. Once you chose Excel you will navigate to the folder where the files were saved. The select the file. You will do this twice, once for each file.
Note – you may receive a message that identifies an error, we will ignore the error for now.
How to open the Power BI Query Editor

Now the you have connected your two spread sheets using the Get Data option, we now need to edit our data. Most of the time, after you connect to your data you will want to add or remove a few columns. In this tutorial we will need to correct a few errors and remove a few columns.
The Power BI Query Editor grid
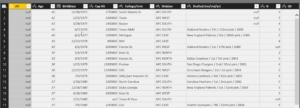 Take a look at the image to the left. After clicking the Edit Queries option a grid representation of your data displays and allows you to begin editing the data. Now we are going to change the query names, remove a few columns and then correct the errors. Enroll in our course for the full lesson.
The list of Power BI Queries
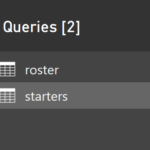 On the left side of the Edit Queries page you will notice that there is a list of queries. When you click on a query the grid in the middle of the page will change to show the rows and columns of the selected query. This is also one of the places you can change the name of the query by right clicking on the name of the query and choosing the rename option.
Sign up for a video course for more information.
Power BI Query Settings
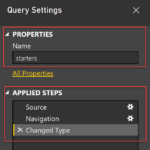 On the right side of the edit queries page are the Query Settings. The Query settings shows both the properties and the applied steps. Each time we make a change to a column it is reflected in applied step section. Since each query change is made it is recorded as an applied step. The cool thing about having a list of changes is that it is possible to return at anytime and alter the recorded step.
Sign up for our lecture course for a deeper dive.
Removing Errors in the Power BI Query Editor
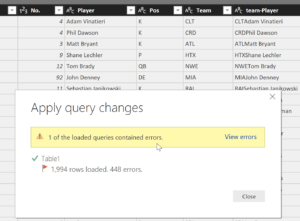 Sometimes the first time you load a query an error will display. This can be caused by many different data problems. A common problem is that Power BI sees many numbers in a column so it assumes the column is a number. However, non numeric data is also in a few of the rows. Power BI tries to make the column a number but can’t due to the non-numeric data, so we end up with an error instead.
In this case we have a column called Yrs. It contains the number of years each player has played. All of the values are numbers with the exception of first year players. For first year players the data contains a value of “Rook”. In this case Power BI attempted to create the column with a data type of a number, but it needs to be text.
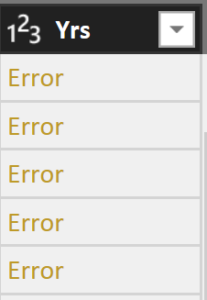 After clicking the View Errors link Power BI displays the error in the column. When you click on the error in the column Power BI tells you the problem is the data format.

Power BI tells you the problem is the value of “Rook”. So we will click on the area of the column header that displays the. The symbol 123 tells us that the data type of that Yrs column is a number. To change that to be text we click on the 123 symbol and change the data type to text. The new symbol in the column header will now be abc. So before the change the column header looked like this ![]() after the change it will look like this
after the change it will look like this ![]() .
.
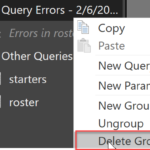 Anytime that the Power BI Query Editor encounters an error the Power BI will create another query group called Query Errors. We need to delete the group. To delete a query group you simply right-click and select delete.